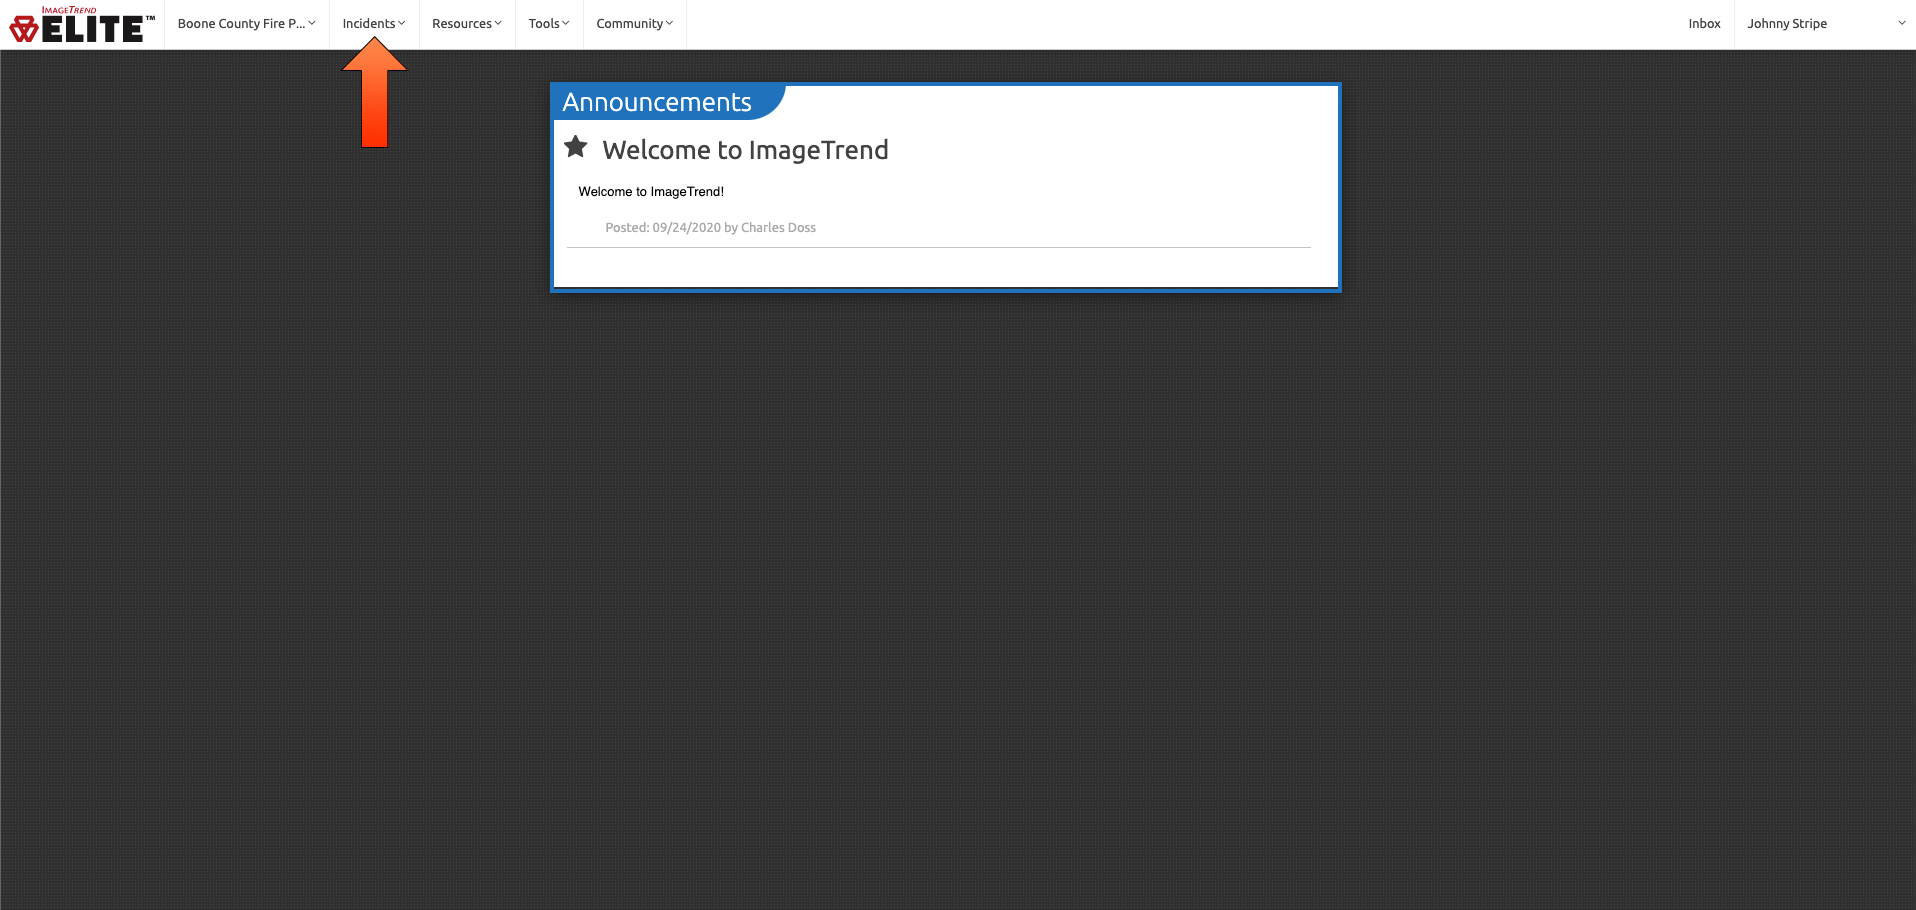
After logging into the ImageTrend system to complete a fire incident report click on the “Incidents” tab at the top of the Announcements page.
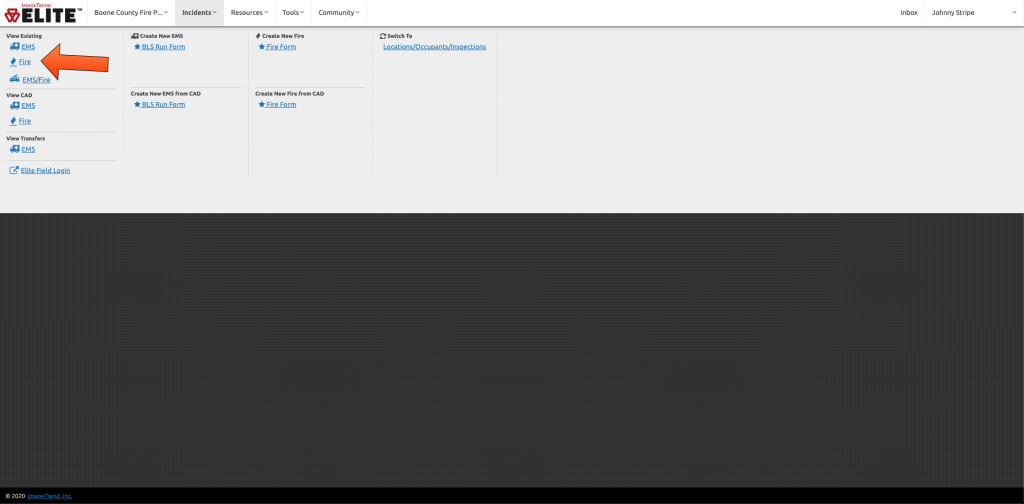
Click on “Fire” under the “View Existing” section.
Fire Incident List
The “Fire Incident List” will display a list of all fire incidents and the status of the incident report.
Locked – If the incident report was been completed and locked a lock icon will show in this column.
Validity – The validity score for the incident report.
Status – Current status of the incident report, Draft, Crew Complete, Need Crew Attention, Crew Edits Complete, QA Reviewed.
Incident Date – Date the incident was dispatched.
Incident Number – Incident number assigned by Boone County Joint Communications.
Incident Type – Type of incident. This will remain blank until an incident type is selected in the report.
Incident Address – The location of the incident.

You can narrow the list of incidents to a specific date range by changing the “Incident Date”
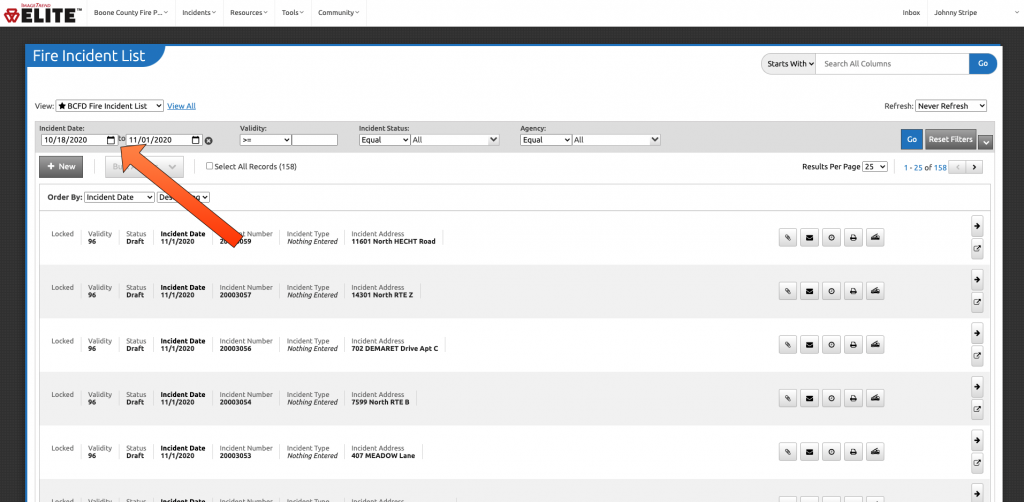
After locating the correct incident click the arrow to enter the report.
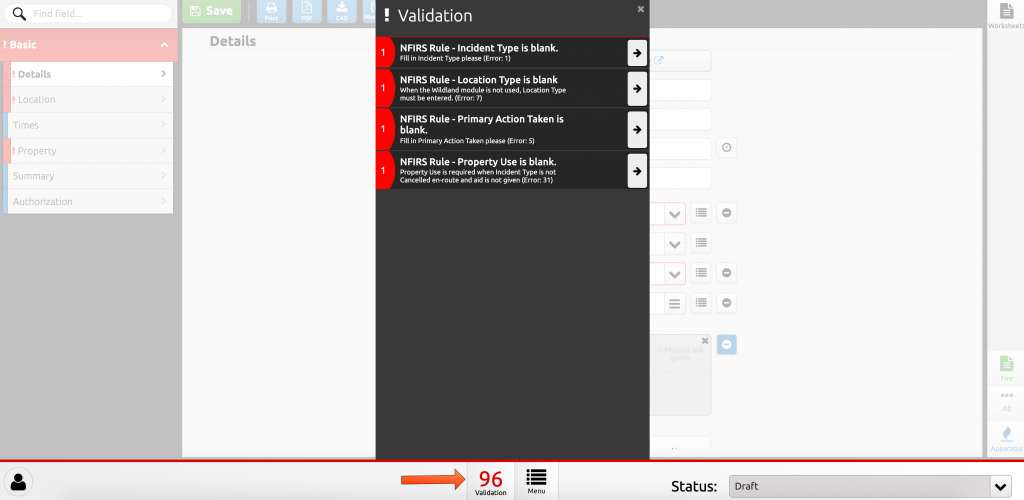
Required fields are indicated by a red exclamation point and must be completed before the report can be marked as finished. Sections or panels with required fields still needing completed are also indicated by a red exclamation mark.
Click on “Validation” in the bottom row to see a list of the required fields that still need to be completed.
Basic Section
Print – Print the current report.
PDF – Export current report as a PDF.
CAD – Download incidents from CAD. This button is only used in the BLS Run Form. It should not be used in this report type.
Messages – Unread messages for this incident. Primarily CQI related.
Details Panel
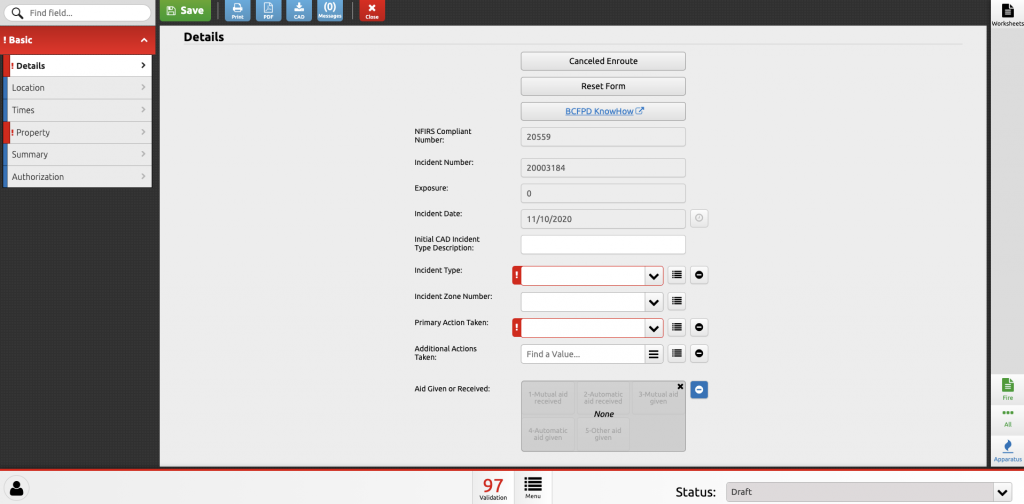
Canceled Enroute – Easy button, this button will auto fill all required fields, except the narrative, for a canceled enroute incidents.
Reset Form – This will clear the fields that were filled in with the “Canceled Enroute” button.
BCFPD KnowHow – Link to the BCFPD KnowHow page.
NFIRS Compliant Number – Auto generated number for NFIRS. This field can not be changed.
Incident Number – The incident number is automatically imported from the CAD system. This field can not be changed.
Exposure – Number of fire exposures. Auto filled based on other entires in the report.
Incident Date – This is the date the incident was dispatched. This field in automatically imported from the CAD system and should not be changed.
Initial CAD Incident Type Description – Nature code imported from CAD.
Incident Type – This is the actual situation that emergency personnel found on the scene when they arrived. These codes include the entire spectrum of fire department activities from fires to EMS to public service. This information can be used to analyze the frequency of different types of incidents, provide insight on fire and other incident problems, and identify training needs.
For incidents involving fire and hazardous materials or fire and EMS, use the fire codes. Always use the lowest numbered series that applies to the incident. You will have an opportunity to describe multiple actions taken later in the report.
Incident Zone Number – Primary station run box the incident took place in.
Primary Action Taken – The duties performed at the incident scene by the responding fire department personnel.
These data elements, together with Incident Type, enable a fire department to document the breadth of activities and the resources required by the responding fire department to effectively handle the incident. This information also provides some indication of the specific types of services provided by the fire department.
Be as specific as possible in stating the action taken. The Additional Action Taken fields are optional. The Primary Action Taken is the most significant action taken by the fire department at the scene (i.e., use the code with the lowest numerical value).
Additional Action Taken – Be as specific as possible in stating the action taken. The Additional Action Taken fields are optional.
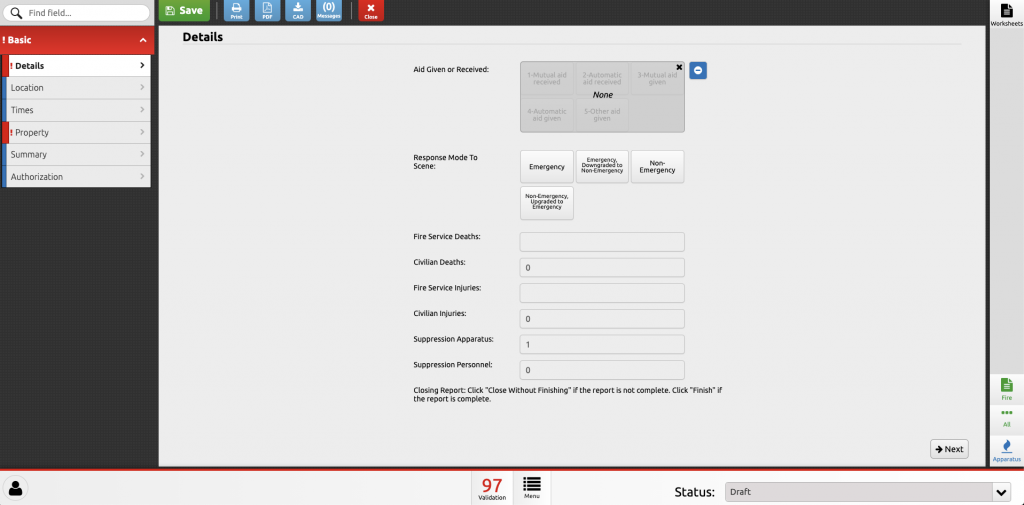
Aid Given or Received – Aid given or received, either automatically (i.e., prearranged) or mutually for a specific incident. These actions are defined as:
Aid Received (automatic or mutual): A fire department handles an incident within its jurisdiction with additional manpower or equipment from one or more fire departments outside its jurisdiction. Aid received can be either mutual or automatic aid.
Aid Given (automatic or mutual): A fire department responds into another fire department’s jurisdiction to provide assistance at an incident or to cover a vacated station while the receiving fire department is busy at an incident. Aid given can be either mutual or automatic aid.
Other Aid Given: A fire department covers and responds to another jurisdiction or locale that has no fire department.
No Aid: A fire department handles an incident within its jurisdiction without help from adjacent or outside fire department.
Aid information can be used to study response levels necessary to control various fire and emergency situations. It can be used to determine the adequacy of resources at the local level and the need for adjusting cooperative agreements. The Aid Given or Received entry serves as data control to ensure that the same incident is not counted more than once while still giving credit for activity performed by outside departments.
Response Mode to Scene – How did units respond to the incident.
Emergency – Responded with lights and siren
Emergency downgraded to non-emergency – Began response with lights and siren but downgraded to no lights and sirens prior to arrival.
Non-emergency – Responded no no lights or siren.
Non-emergency, upgraded to emergency – Response began with no lights or siren but upgrade to lights and siren prior to arrival.
How many N95 masks were used on this call? – Enter the number of N95 masks that were used on this incident. If no N95 masks were used enter 0. This is a required field and how we calculate mask usage for CARES reimbursement.
Fire Service Deaths – Number of fire fighter deaths associated with the incident. Auto filled based on other entires in the report.
Civilian Deaths – Number of civilian deaths associated with the incident. Auto filled based on other entires in the report.
Fire Service Injuries – Number of fire fighter injuries associated with the incident. Auto filled based on other entires in the report.
Civilian injuries – Number of civilian injuries associated with the incident. Auto filled based on other entires in the report.
Suppression Apparatus – Number of apparatus that responded to the incident. Number of fire fighter deaths associated with the incident. Auto filled based on other entires in the report.
Suppression Personnel – Number of personnel that responded to the incident. Number of fire fighter deaths associated with the incident. Auto filled based on other entires in the report.
Location Panel
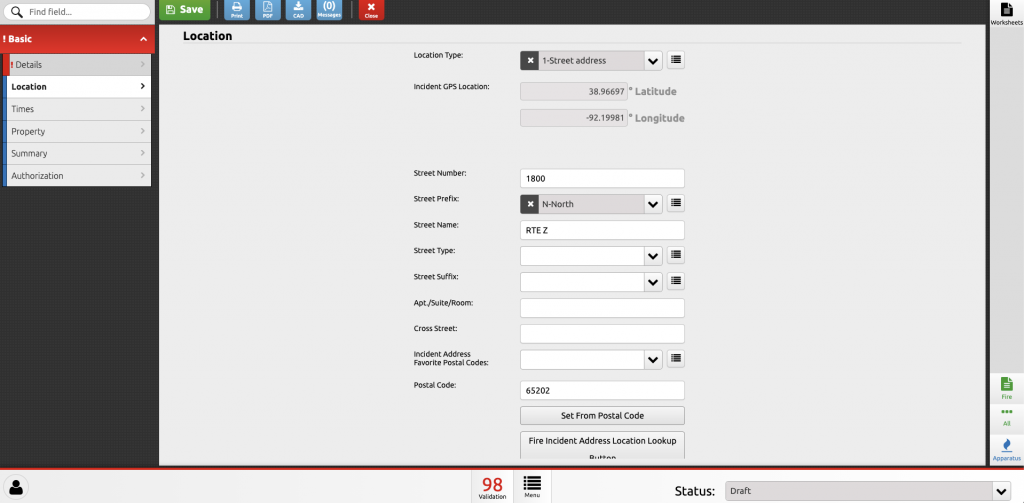
Location Type – The location of the incident, which may be a street address, directions from a recognized landmark, or an intersection of two roadways. The exact location of the incident is used for spatial analyses and response planning that can be linked to demographic data. Incident address information is required at the local government level to establish an official document of record. This field in automatically imported from the CAD system.
Street address: A normal street address.
Intersection: There is no street address. The incident location is at the intersection of two or more streets, roads, etc. Check or mark this box and enter the first street in the Street or Highway field. The intersecting street(s) is entered in the Cross Street or Directions field.
In front of: No street address is available. However, the incident location is in front of an area with a street address. Check or mark this box and complete the address fields. An example of this might be a park, plaza, or common area in front of a building with a street address.
Rear of: No street address is available. However, the incident location is in the rear of an area with a street address. Check or mark this box and complete the address fields. An example of this might be an alley that runs behind a building with a street address.
Incident GPS Location – GPS location of the incident. This field in automatically imported from the CAD system.
Street Number – The number or milepost of the specific location where the incident occurred. This field in automatically imported from the CAD system.
Street Prefix – The directional descriptor appearing before a street or highway name. This field in automatically imported from the CAD system.
Street Name – The street or highway name where the incident occurred. This field in automatically imported from the CAD system.
Street Type – The street type descriptor appearing after a street or highway name. This field in automatically imported from the CAD system.
Street Suffix – The directional descriptor appearing after a street or highway name. This field in automatically imported from the CAD system.
Apt./Suite/Room – The number of the specific apartment, suite, or room where the incident occurred. This field in automatically imported from the CAD system.
Cross Street – Still in development.
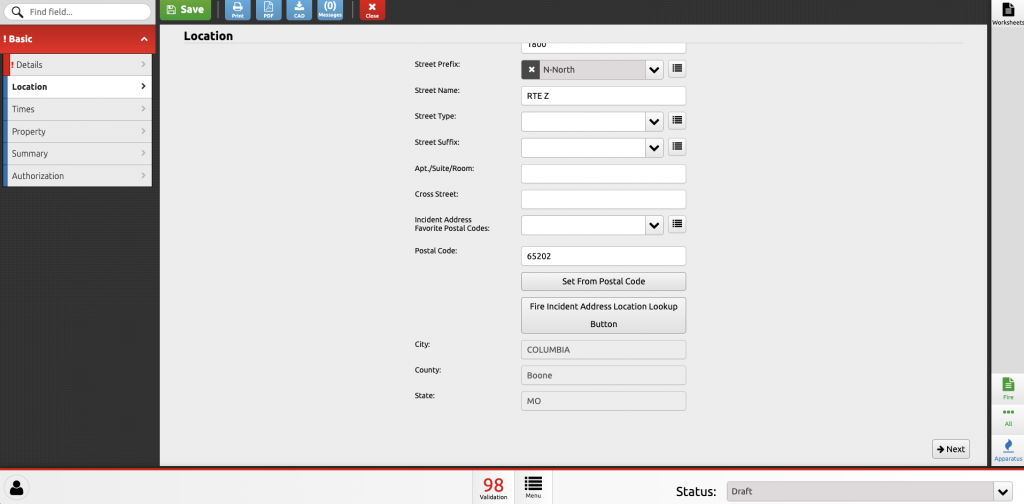
Incident Address Favorite Postal Codes – List of commonly used postal codes in Boone County.
Postal Code – The numerical code assigned by the U.S. Postal Service to all U.S. jurisdictions. This field in automatically imported from the CAD system.
Set From Postal Code – This button will set the city, state, and county based on the postal code.
Fire Incident Address Location Lookup Button – Opens a window to look up postal code based on city.
City – The city where the incident occurred. If the incident occurred in an unincorporated area, use the city found in the mailing address for the incident location. This field in automatically imported from the CAD system.
County – The county where the incident occurred. This field in automatically imported from the CAD system.
State – The State where the incident occurred. This field in automatically imported from the CAD system.
Times Panel
Times are all automatically imported from the CAD system. If there is an error please report that to the Duty Chief so they can correct it.
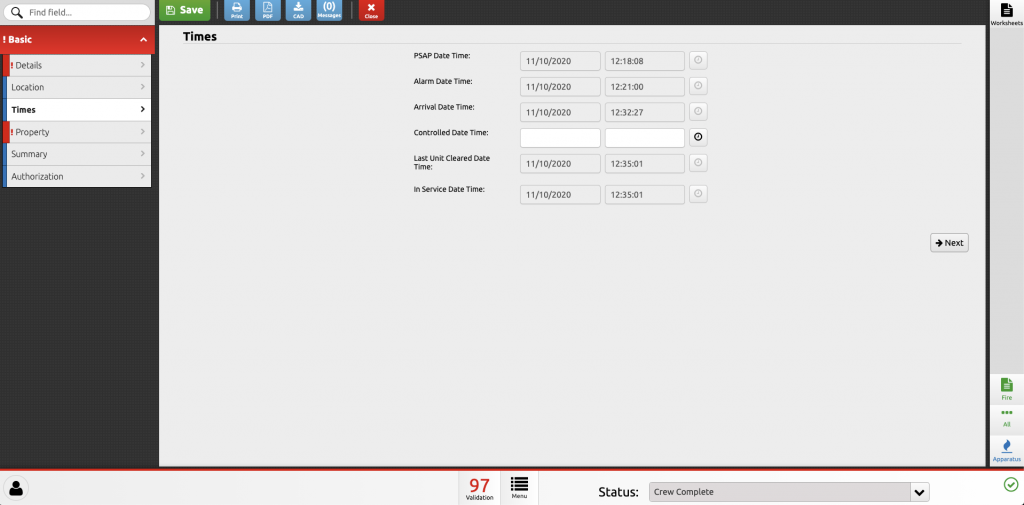
PSAP Date Time – The actual month, day, year, and time of day (hour, minute, and seconds) when the alarm was received by Boone County Joint Communications. This field in automatically imported from the CAD system.
Alarm Date Time – The actual month, day, year, and time of day (hour, minute, and seconds) when the alarm was received by the fire department. This is not an elapsed time. This field in automatically imported from the CAD system. This field in automatically imported from the CAD system.
Alarm time is important for three reasons: (1) as a legal requirement for recording the precise time notification was made of the incident, (2) as information for determining the frequency of particular types of incidents by time period, and (3) as the starting time to determine the length of time taken to arrive at an incident and the total amount of time spent on the incident scene.
Arrival Date Time – The actual month, day, year, and time of day when the first responding unit arrived at the incident scene. This is not an elapsed time. This field in automatically imported from the CAD system.
This element reflects the time spent traveling to the scene of the incident. This information can be useful to fire department management in determining (1) the actual time spent at an incident and (2) any delay between alarm and arrival.
Controlled Date Time – The actual month, day, year, and time of day when the fire is brought under control or the incident is stabilized and does not require additional emergency resources. “Controlled” is the time when the incident commander determines that the fire will not escape from its containment perimeter. This field in automatically imported from the CAD system.
The time spent stabilizing a fire provides fire department management with the information needed to analyze the duration patterns of different types of fires. This can assist in determining service demand and costs for resource allocation.
Last Unit Cleared Date Time – The actual month, day, year, and time of day when the last unit cleared the incident scene. This is not an elapsed time. This field in automatically imported from the CAD system.
Combined with the previously recorded times, this element is valuable to fire department management in determining the actual time spent at an incident.
In Service Date Time – The actual month, day, year, and time of day when all units returned to service. This is not an elapsed time. This field in automatically imported from the CAD system.
Property Panel
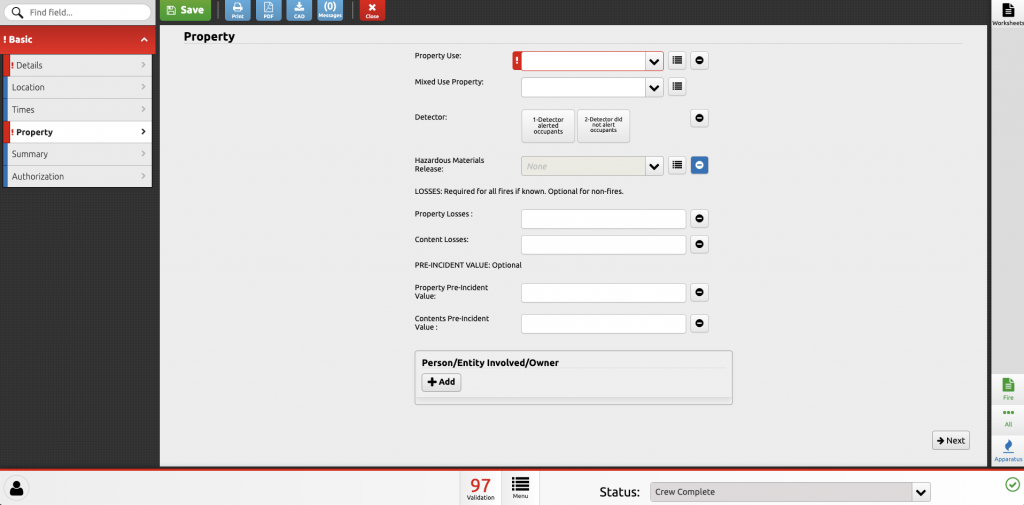
Property Use – Each individual property has a specific use, whether a structure or open land. This entry refers to the actual use of the property where the incident occurred, not the overall use of mixed use properties of which the property is part. The intent of this entry is to specify the property use, not the configuration of the building or other details of the property.
This element permits analyses of differing fire problems that occur on a wide range of property types. Information on the frequency, losses, and types of fires for each property use can assist in targeting fire prevention programs and fire protection or suppression systems for each type of property. It often assists in ordering priorities for inspection, developing new building codes, and evaluating the success of programs directed at particular types of properties.
If the property is a structure that is under construction, select the use for which it will be used. This is not applicable to construction site incidents (code 981). If the structure is vacant or being demolished, select its last significant use.
Mixed Use Property – This data element captures the overall use of a property. If a property has two or more uses, then the Mixed Use Property designation applies.
Documenting an incident that occurs on a property with more than one use is important to better identify the overall or main use of the property in which emergency incidents occur. Knowing the overall property use allows for better analysis of incident causes and targeting of prevention strategies. It also is important information for use in code development and enforcement as well as for inspection activities.
Detector – Did a detector alert the occupant. The information on whether or not a detector alerted the occupants of a structure to an emergency is important for understanding fire control and life safety with and without detection equipment.
Was a smoke alarm or carbon monoxide alarm installed by BCFPD staff? – If fire district staff installed a smoke or carbon monoxide alarm during this incident answer yes.
How many smoke alarms were installed? – How many smoke alarms were installed.
Where was the smoke alarm installed ? – Where did the smoke alarms get installed. Use general room and level information. Master bedroom first floor, living room, hallway, etc.
How many carbon monoxide alarms were installed? – How many carbon monoxide alarms were installed.
Where was the carbon monoxide alarms installed? – Where did the carbon monoxide alarms get installed. Use general room and level information. Master bedroom first floor, living room, hallway, etc.
Hazardous Materials Release – Was a hazardous materials released during this incident. Default value is none.
Property Losses – Estimates of the total property dollar loss.
Enter the best estimates of dollar losses and pre-incident values that are practical to make or obtain. Monetary losses should be estimated as accurately as possible, though it is understood that the estimates may be rough approximations. If there was no loss or no pre-incident value, check or mark the appropriate None boxes. In making this entry, use only whole dollars; do not include cents
Content Losses – Estimates of the total contents dollar loss.
Enter the best estimates of dollar losses and pre-incident values that are practical to make or obtain. Monetary losses should be estimated as accurately as possible, though it is understood that the estimates may be rough approximations. If there was no loss or no pre-incident value, check or mark the appropriate None boxes. In making this entry, use only whole dollars; do not include cents
Property Pre-Incident Value – Estimates of the total property pre-incident value.
Enter the best estimates of dollar losses and pre-incident values that are practical to make or obtain. Monetary losses should be estimated as accurately as possible, though it is understood that the estimates may be rough approximations. If there was no loss or no pre-incident value, check or mark the appropriate None boxes. In making this entry, use only whole dollars; do not include cents
Contents Pre-Incident Value – Estimates of the total content pre-incident value.
Enter the best estimates of dollar losses and pre-incident values that are practical to make or obtain. Monetary losses should be estimated as accurately as possible, though it is understood that the estimates may be rough approximations. If there was no loss or no pre-incident value, check or mark the appropriate None boxes. In making this entry, use only whole dollars; do not include cents
Person/Entity Involved/Owner
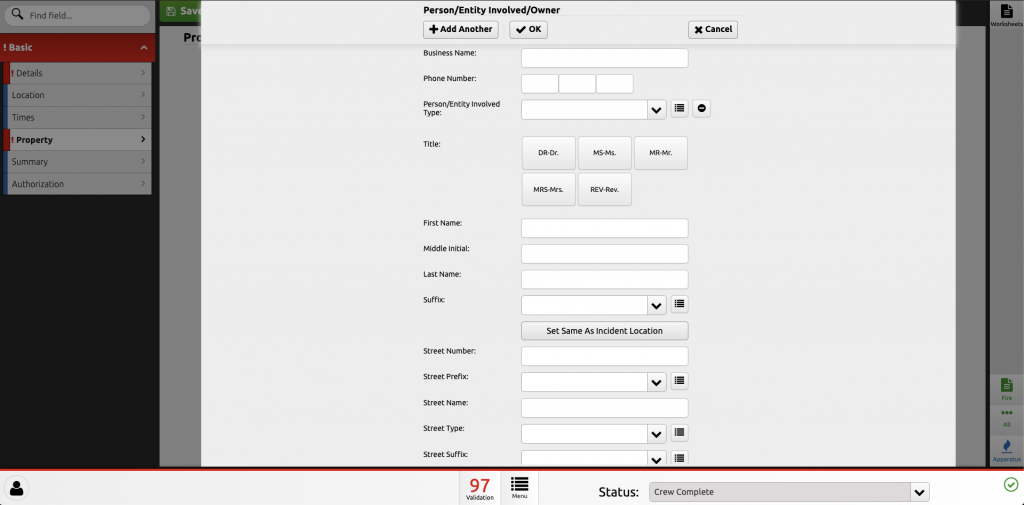
Business Name – The full name of the company or agency occupying, managing, or leasing the property where the incident occurred.
Phone Number – The telephone number of the person or entity involved in the incident.
Person/Entity Involved Type – Role of the person or entity with their information listed in this section.
Title – Name prefix of the person listed in this section.
First Name – Enter the full name of the person as normally written.
Middle Initial – Enter the full name of the person as normally written.
Last Name – Enter the full name of the person as normally written.
Suffix – Enter the full name of the person as normally written.
Set Same as Incident Location – This button will set the address of the person/entity involved/owner to the same address as the incident set in the Location Panel.
Street Number – The street number of the person or entity involved in the incident.
Street Prefix – The directional descriptor appearing before a street or highway name of the person or entity involved in the incident.
Street Name – The street or highway name name of the person or entity involved in the incident.
Street Type – The street type descriptor appearing after a street or highway name.
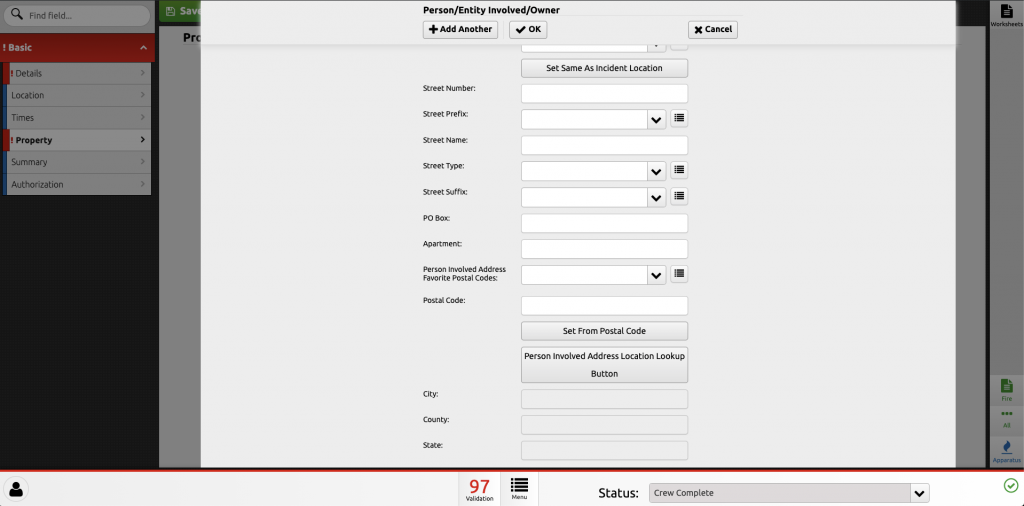
Street Suffix – The directional descriptor appearing after a street or highway name.
P.O. Box – The number of a rented compartment in a post office for the storage of mail that is picked up by the business occupant.
Apartment – The number of the specific apartment, suite, or room.
Person Involved Address Favorite Postal Codes – List of commonly used postal codes in Boone County.
Postal Code – The numerical code assigned by the U.S. Postal Service to all U.S. jurisdictions. This field in automatically imported from the CAD system.
Set From Postal Code – This button will set the city, state, and county based on the postal code.
Person Involved Address Location Lookup Button – Opens a window to look up postal code based on city.
City – The city where the person/entity/owner resided. If the incident occurred in an unincorporated area, use the city found in the mailing address for the incident location.
County – The county where the person/entity/owner resided.
State – The State where the person/entity/owner resided.
Summary Panel
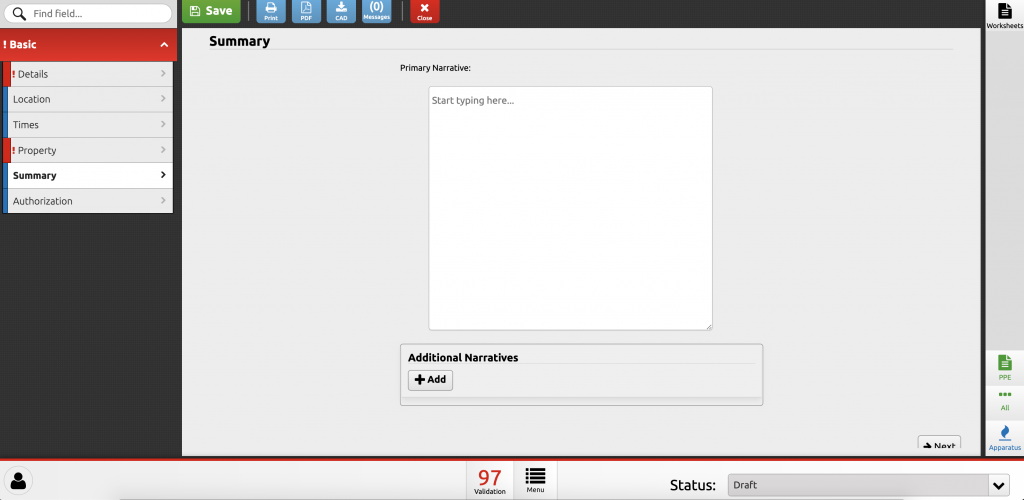
Primary Narrative – The primary narrative is an area for any comments that might be made concerning the incident. It is also a place to describe what happened, fire department operations, or unusual conditions encountered. Use this space to describe the incident in your own words. The standard format should answer four main questions.
- What were you called to?
- What did you find when you got there?
- What did you do about it?
- How did it turn out?
Additional Narratives – Notes will be added to this section from the CAD system. For large/significant incidents an additional narrative written by command/general staff may be added to this section. This will be at the direction of the incident commander.
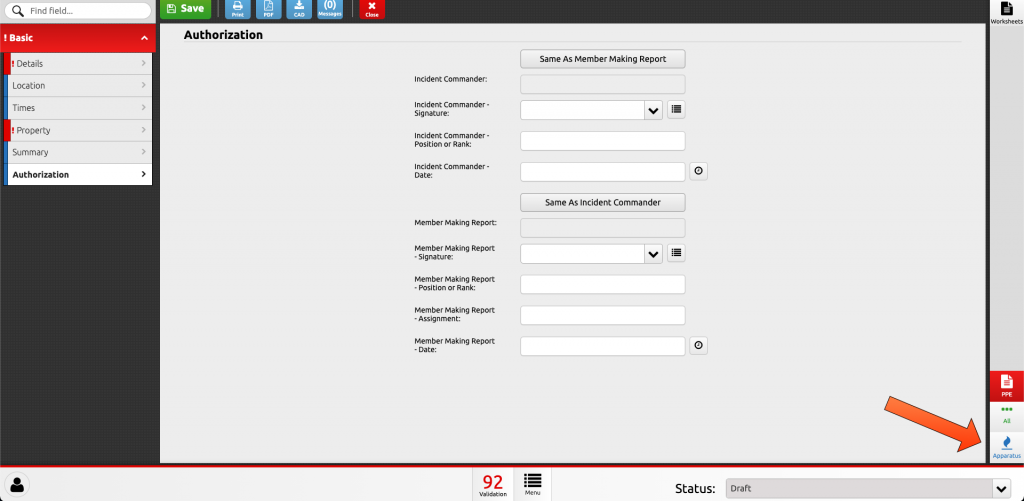
Authorization Panel

Same as Member Making Report – Button to make all Incident Commander Fields the same value as the Member Making Report fields.
Incident Commander – District ID of the incident commander. This field is auto-populated when you select the incident commander in the Incident Commander Signature field.
Incident Commander Signature – Name of the incident commander. This field is a drop down list of all district personnel.
Incident Commander Position or Rank – Rank of the incident commander. This field is auto-populated when you select the incident commander in the Incident Commander Signature field.
Incident Commander Date – Date the report was completed. This field will auto populate to the current date when any of the other fields in the Incident Commander section is completed.
Same as Incident Commander – Button to make all Member Making Report Fields the same value as the Incident Commander fields.
Member Making Report – District ID of the member completing the report. This field is auto-populated when you select the member making report in the Member Making Report Signature field.
Member Making Report Signature – Name of the member completing the report. This field is a drop down list of all district personnel.
Member Making Report Position or Rank – Rank of the member completing the report. This field is auto-populated when you select the member making report in the Member Making Report Signature field.
Member Making Report Assignment – Station assignment of the member completing the report.
Member Making Report Date – Date the report was completed. This field will auto populate to the current date when any of the other fields in the Member Making Report section is completed.
Apparatus
Details about who responded to the incident is entered in the Apparatus Power Tool.
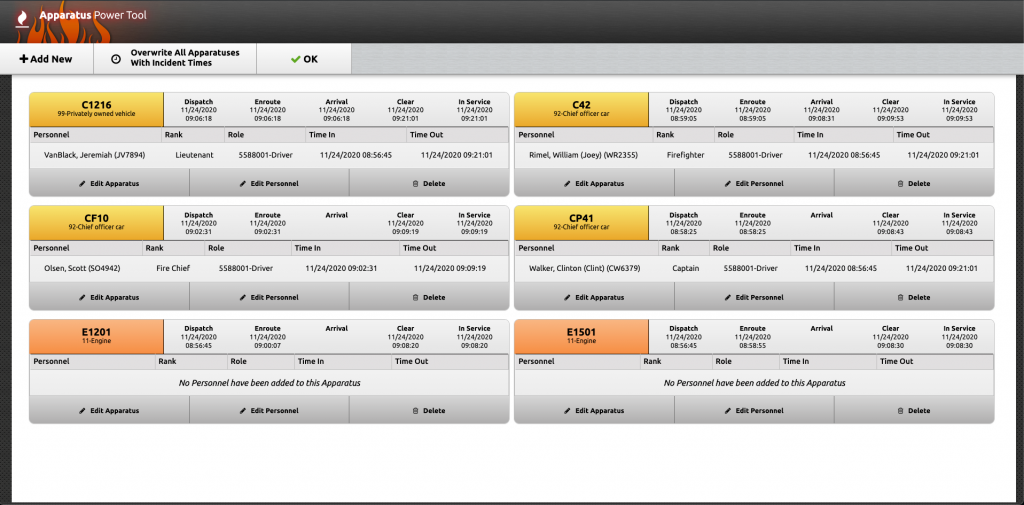
All units that were dispatched, responded on the radio, or went enroute via the Freedom app will show up in the Apparatus Power Tool.
Officers and career staff will show up with their names automatically associated with their radio number. Apparatus and POVs will need to be added manually.
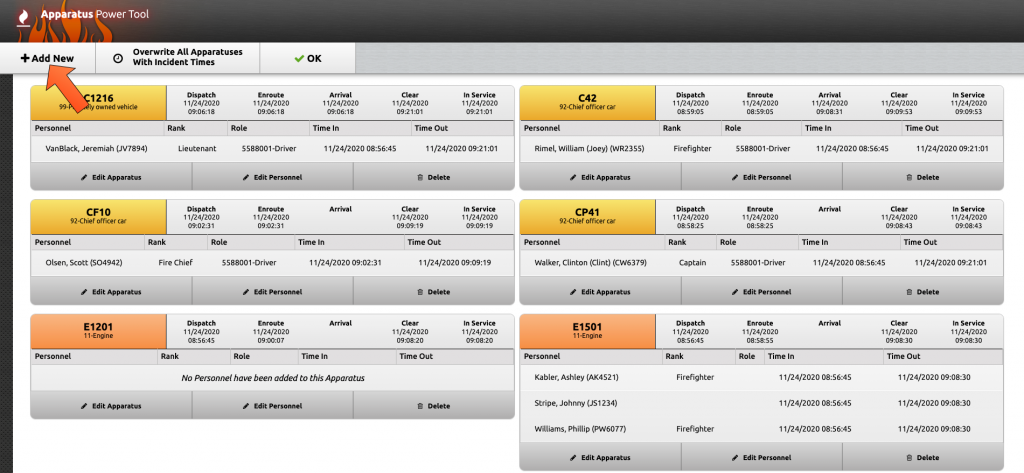
Add New – Add a new apparatus or POVs to the incident.
Overwrite All Apparatuses with Incident Times – ### DO NOT PRESS THIS BUTTON### This will alter all the incident times. If you do press this button please send an email to reports@bcfdmo.com and indicate you pressed this button. Also include the incident number in the email.
OK – Saves and closes the Apparatus Power Tool
Edit Apparatus – Make no changes in this section.
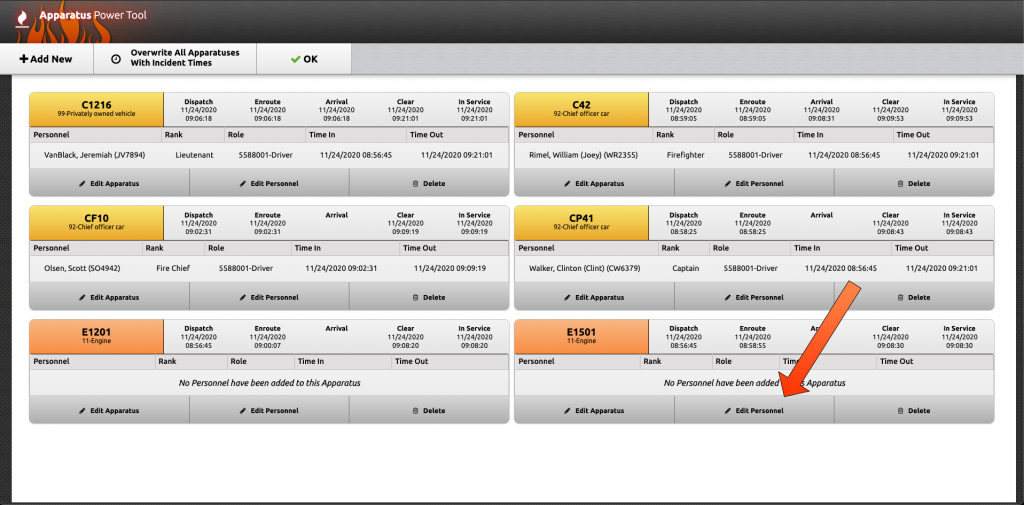
Edit Personnel – This is where personnel is added to the apparatus.
Delete – Removed the unit from the report. Do Not Delete units from the incident.

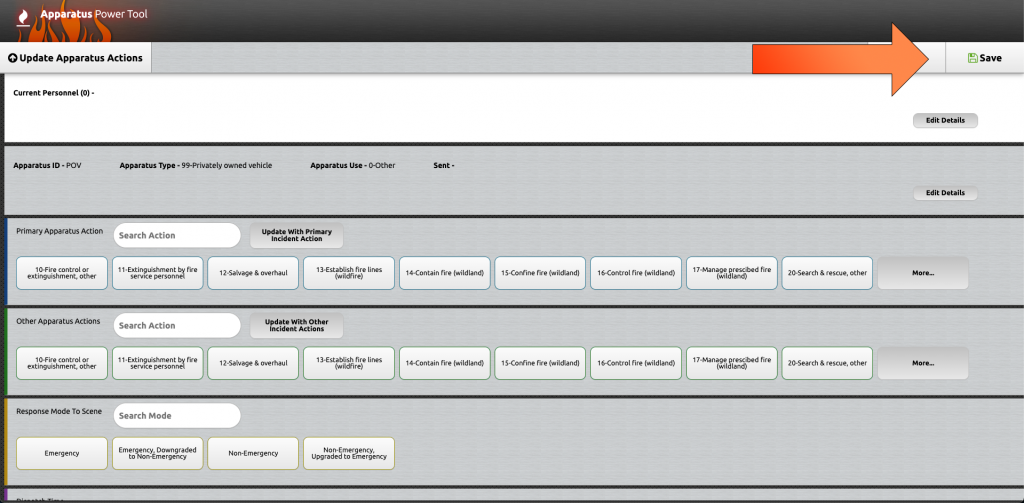
Update Personnel Actions – Button is inactive.
Add Personnel – Add personnel to the selected unit.
Back – Returns to previous screen.
Save – Saves changes.
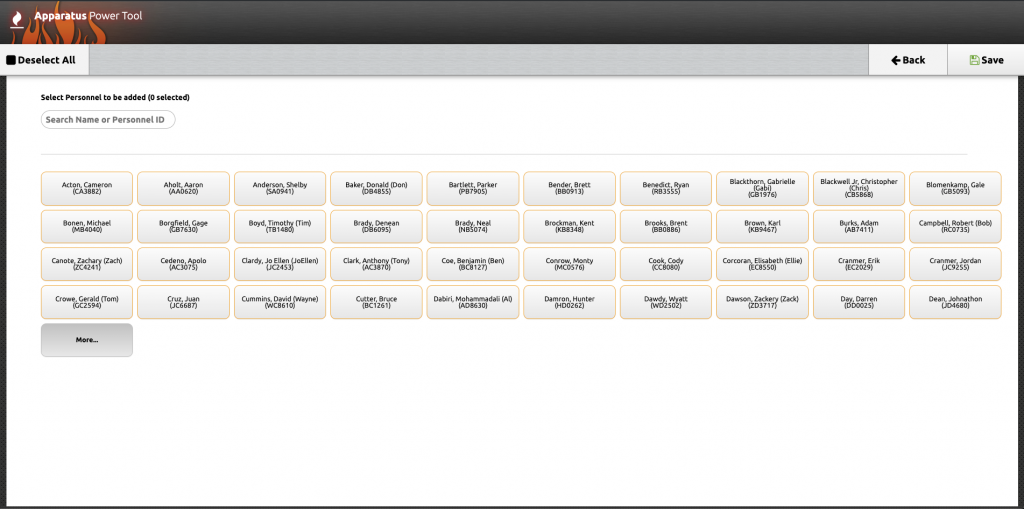
From this menu select all personnel that responded on that apparatus. When all the personnel have been selected click save to return to the previous menu.
Deselect All – Will remove all selected personnel from the apparatus.
Back – Return to previous screen.
Save – Save changes and returns to initial Apparatus Power Tool screen.
Search Name of Personnel ID – Type the name or ID of personnel to search the complete list of personnel.
More – Open the complete list of district personnel.
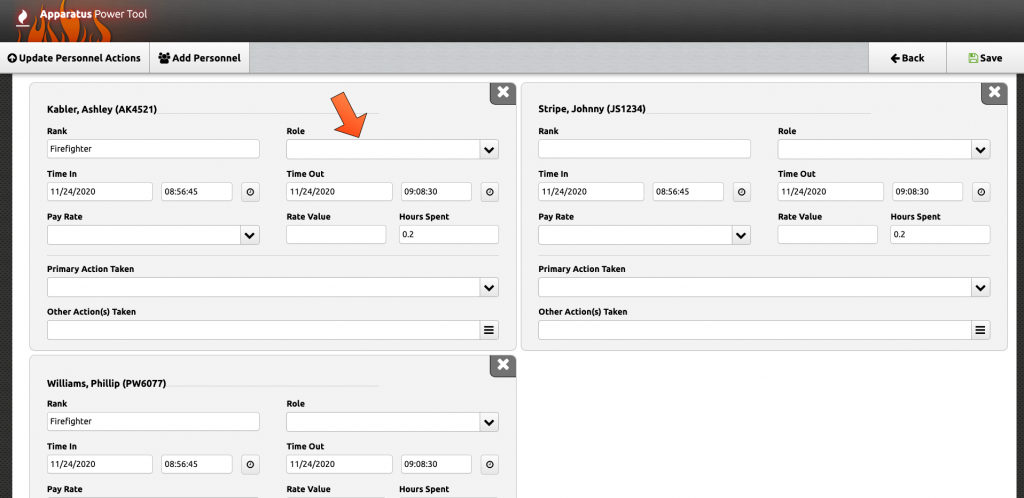
After the personnel has been assigned to the apparatus the role should be updated to show each persons role in the apparatus.
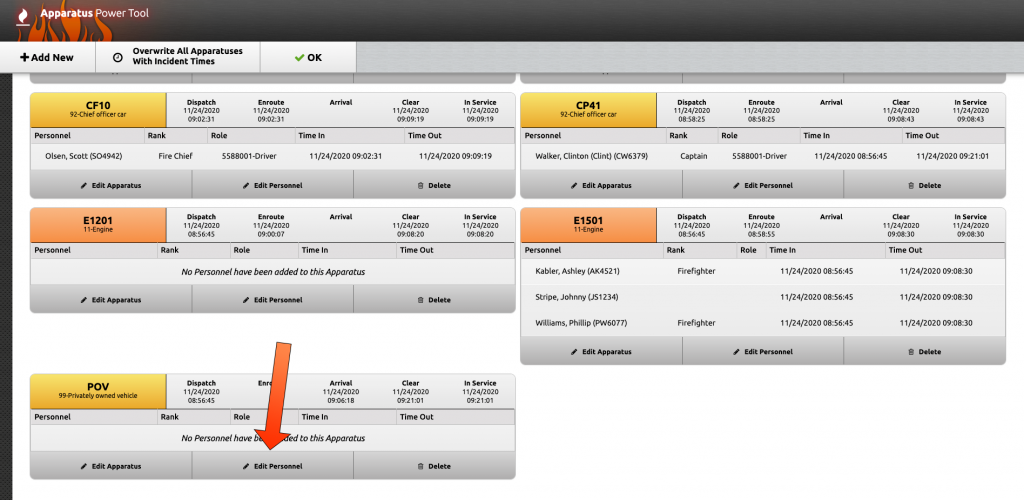
POV
To add POV personnel to the incident add “POV” as an apparatus in the Apparatus Power Tool and list all POV personnel under that apparatus.
Type “POV” in the Search Apparatus ID box and select “POV”

Click “Save”
Click “Edit Personnel”
From this menu select all personnel that responded POV. When all the personnel have been selected click save to return to the previous menu.

Deselect All – Will remove all selected personnel from the apparatus.
Back – Return to previous screen.
Save – Save changes and returns to initial Apparatus Power Tool screen.
Search Name of Personnel ID – Type the name or ID of personnel to search the complete list of personnel.
More – Open the complete list of district personnel.
Additional Options
PPE Work Sheet
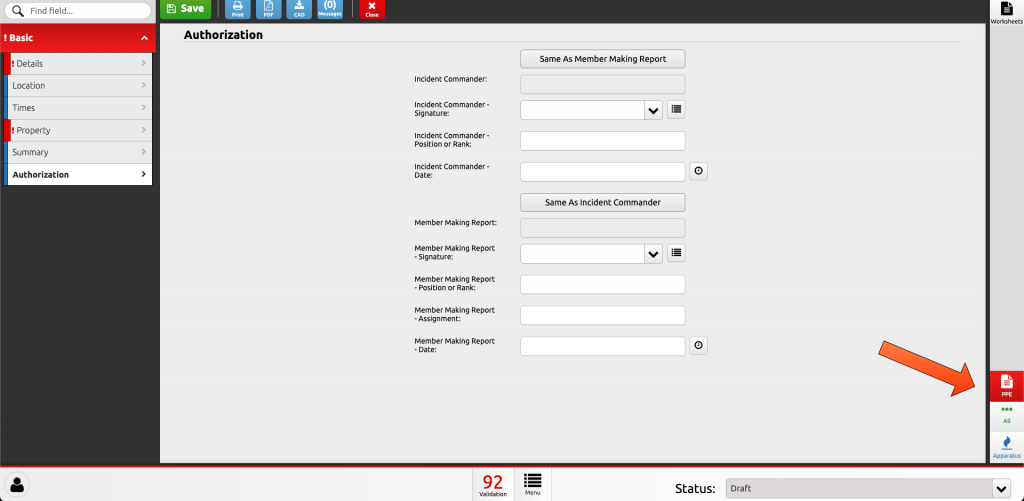
To track our PPE usage the PPE worksheet must be completed for every incident.
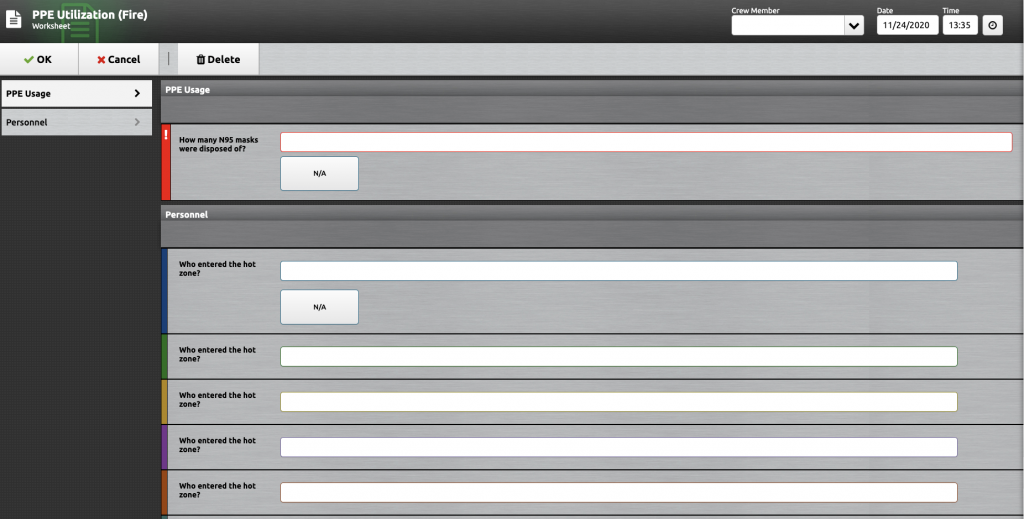
OK – Saves and closes the PPE Worksheet.
Cancel – Closes the PPE Worksheet with out saving.
Delete – Closes the PPE Worksheet with out saving.
Crew Member – This is not required.
PPE Usage – Enter the total number of N95 masks used on this incident. Select N/A if no PPE was used.
Personnel – List the personnel that entered the hot zone. One name per line. If more than 10 lines are needed send additional names to reports@bcfdmo.com. Select N/A if no one entered the hot zone.